Bathroom Waterproofing: Why It Matters and How It's Done
Most bathroom remodeling problems don't show up on day one. They show up two years later — when you notice the grout cracking, a soft spot in the floor, or black mold creeping up the wall behind your vanity. By that point, the tile is coming off, the substrate is rotting, and what started as a $12,000 remodel now needs to be redone from scratch.
In almost every case, the root cause is the same: waterproofing was done wrong — or skipped entirely.
This guide explains what proper bathroom waterproofing actually involves and how to waterproof a bathroom correctly. Why most homeowners don't find out it was skipped until serious damage has already happened, and what you can do about it whether you're planning a remodel or dealing with an existing problem.
Most Homeowners Don't Think About This Until It's Too Late
Water is patient. It doesn't flood your bathroom overnight — it seeps. Through grout lines, around the base of the shower, through small gaps in the tile. Over months and years, it saturates whatever substrate is behind the tile, then the framing, then the subfloor.
By the time you see mold or feel a soft spot underfoot, the damage has been building for a long time. Mold remediation alone can run $500–$6,000 depending on how far it's spread. A full shower demo and rebuild adds another $8,000–$20,000 on top of that.
The frustrating part? None of this is inevitable. A properly waterproofed bathroom — done correctly the first time — should last 20–30 years without moisture intrusion issues.
So why does it keep happening? Usually because waterproofing was either skipped to save money, or done incorrectly by a contractor who didn't know better.
The First Thing to Understand: Tile Is Not Waterproof
This surprises a lot of homeowners. It surprised us when we first started seeing bathroom failures — the tile looked perfect from the outside, but the wall behind it was completely saturated.
Here's the reality: tile is water-resistant, not waterproof. Ceramic and porcelain tiles repel water at the surface, but grout is porous. Water that sits in grout lines long enough will absorb through. And once it gets behind the tile, if there's nothing stopping it — no membrane, no proper substrate — it goes straight into the wall.
What Actually Makes a Bathroom Waterproof
Here's why waterproofing behind tile matters: it's not a single product or a single step. It's a system — multiple layers that work together to keep moisture in the shower and out of your walls, floor, and framing. Remove any layer, and the whole system is compromised.
The Three Layers of Proper Bathroom Waterproofing
Layer 1 — The Substrate (Cement Board, Not Drywall)
The substrate is what your tile attaches to. In dry areas of a bathroom — above the mirror, above the shower splash zone — standard drywall is fine. In wet areas, it's not.
The cement board vs drywall in bathroom debate isn't really a debate — standard drywall disintegrates when it gets wet. Standard drywall disintegrates when it gets wet. "Moisture-resistant" drywall (the greenboard or purpleboard you see at hardware stores) does better, but it's still not rated for direct water exposure. In a shower, you need a cement board or a foam tile backer.
| Material | Use in Wet Zone | Water Resistance | Recommended? |
|---|---|---|---|
| Standard drywall | Never | None | No — fails immediately |
| Moisture-resistant drywall | Dry areas only | Partial | Not in showers |
| Cement board (HardieBacker, Durock) | Yes | Good | Standard choice |
| Foam tile backer (Wedi, Schluter Kerdi-Board) | Yes | Excellent | Premium, worth it |
COMMON MISTAKE: Many homeowners assume that moisture-resistant drywall ("greenboard") is appropriate for shower walls. It's not. It will hold up longer than standard drywall, but it will still fail with sustained water exposure. Cement board is the minimum for any wet zone.
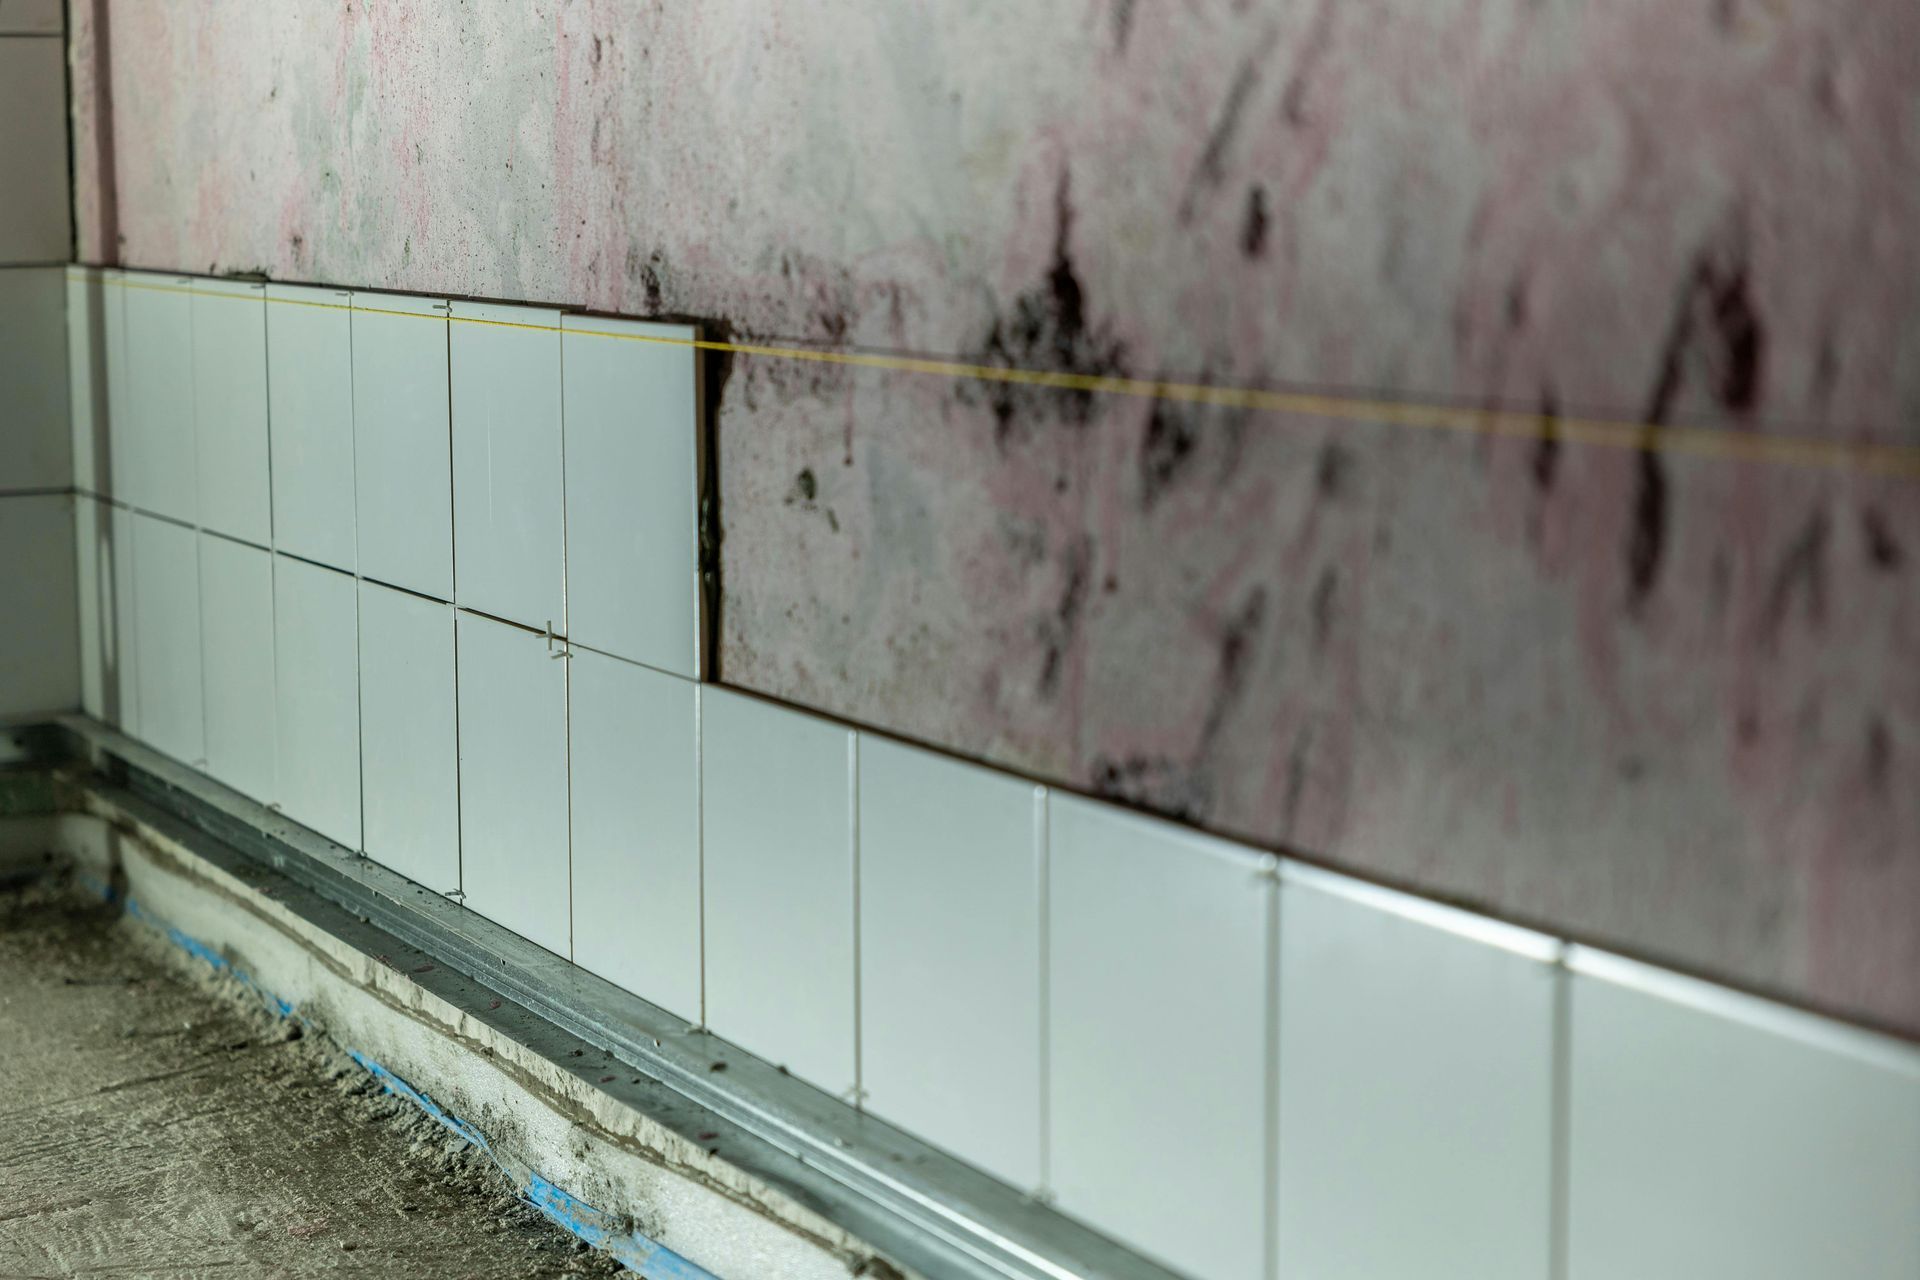
Layer 2 — The Waterproofing Membrane
Even with cement board installed, you need a waterproofing membrane for shower walls and floors — installed between the substrate and the tile. This is the layer that actually stops water.
Without it, water that penetrates the grout lines saturates the cement board and eventually migrates to the framing. Cement board won't rot — but the wood studs behind it will.
Layer 3 — The Shower Pan Liner
The shower floor is the most water-intensive surface in the entire bathroom. Every shower, water runs across it and pools around the drain. The shower pan liner — a continuous sheet installed under the floor tile and up the curb — is what prevents that water from soaking into the subfloor.
Proper shower pan liner installation means the liner slopes toward the drain, wraps up the curb walls by at least 3 inches, and bonds completely around the drain body. Any gap, fold, or puncture creates a path for water to escape.
This is one of the most common failure points in budget remodels. It's also one of the hardest to inspect after the fact — you won't know it's failing until water damage appears months or years later.
Why Bathroom Ventilation Is Part of the Waterproofing Equation
Most homeowners think of waterproofing as something that happens inside the walls. But there's a factor that works against everything you've just installed — and it's invisible: humidity.
Every shower releases significant moisture into the air. Without adequate ventilation, that moisture settles on every surface in the bathroom — walls, ceiling, the back of the door. Over time it condenses, seeps into grout, and creates the same slow saturation problem that bad waterproofing causes. The difference is it's attacking from the outside of the tile, not behind it.
A properly sized exhaust fan — vented to the exterior, not into the attic — is non-negotiable in any bathroom. The general rule is one CFM (cubic feet per minute) per square foot of bathroom floor space, with a minimum of 50 CFM for small bathrooms. For bathrooms with a separate shower enclosure, 110 CFM or higher is more appropriate.
If your exhaust fan is venting into the attic instead of outside, you're pumping moisture directly into your roof structure. In Louisville's winters, that moisture condenses on cold roof sheathing and causes mold and rot — sometimes before the bathroom itself shows any problems.
PRO TIP: Run your exhaust fan for at least 20 minutes after every shower — not just during it. The fan removes moisture from the air, but surfaces stay wet long after the water stops running.
Shower Waterproofing Methods Explained
Once you have the right substrate in place, you need to apply a waterproofing membrane before tiling. There are two main approaches.

Sheet Membranes (Schluter Kerdi and Similar)
Sheet membranes are thin, flexible sheets of polyethylene or similar material that get bonded to the substrate with thin-set mortar. The tile then gets set directly on top of the membrane.
Schluter Kerdi is the most widely recognized brand. It covers the full surface area of the shower walls and floor, and integrates with Schluter's drain system to create a completely continuous waterproof barrier.
Pros: Consistent thickness, highly reliable when installed correctly, integrates with matching drain and accessories, well-documented installation standards.
Cons: Higher material cost, requires precise installation — folds, gaps, or missed areas compromise the system.
Liquid-Applied Membranes (RedGard and Similar)
Liquid membranes get rolled or brushed directly onto the substrate surface and cure into a flexible rubber-like coating.
RedGard (by Custom Building Products) is one of the most common products in this category.
Pros: Easier to apply in tight spaces (corners, niches, curb edges), lower material cost, easy to verify coverage.
Cons: Coverage consistency depends on application technique — thin spots create weak points. Requires multiple coats. Doesn't integrate with a drain system the way sheet membranes do.
| Sheet Membrane | Liquid-Applied Membrane | |
|---|---|---|
| Reliability | Very high (when installed correctly) | High (depends on application) |
| Corners & details | Requires fabric tape at seams | Easier to coat continuously |
| Material cost | Higher | Lower |
| Best for | Full shower builds | Repairs, spot waterproofing |
| Drain integration | Yes (Schluter system) | No |
| DIY-friendly? | Moderate | More accessible |
The Wet Zone — Where Most Waterproofing Failures Happen

Not all areas of a bathroom need the same level of waterproofing. But there are specific zones where failures are almost always concentrated:
The shower floor is the highest risk area. It's constantly wet, water sits on it, and the drain penetration creates a complex sealing challenge.
Inside corners — where walls meet the floor, or two walls meet — are flex points. Materials expand and contract with temperature and humidity changes. Sheet membranes need fabric mesh tape embedded at all inside corners to prevent cracking.
Shower niches are notorious problem areas. They're recessed into the wall, which means cutting into the stud cavity. If the niche isn't waterproofed on all five surfaces before tiling, it becomes a direct moisture pathway into the wall.
The shower curb is where the wet zone transitions to the dry bathroom floor. The pan liner has to wrap over the top of the curb and down both sides. If it stops short, water follows the path of least resistance — into your subfloor.
Pipe penetrations — anywhere a supply line or drain comes through — require careful detailing. A small gap around a pipe is enough for water to migrate over time.
Signs of Poor Bathroom Waterproofing to Watch For
If you have an existing bathroom and are wondering whether waterproofing was done correctly, watch for these warning signs:
- Grout cracking or crumbling — especially at floor-wall transitions and inside corners. This is often the first visible sign of substrate movement from moisture.
- Tiles that sound hollow when tapped — means the tile has separated from the substrate, usually because moisture caused movement behind it.
- Soft or spongy subfloor near the shower — water has reached the wood. This is structural damage.
- Mold or discoloration at the base of the shower walls — especially at the curb or at the floor-wall junction.
- Efflorescence on tile — white mineral deposits that appear on the tile surface. This happens when water moves through the substrate and carries minerals with it to the surface.
- Peeling paint or bubbling drywall on the other side of a shower wall — water has migrated through the entire wall assembly.
- Musty smell in the bathroom even after cleaning and ventilating.
If you're seeing two or more of these, the problem is likely systemic, not cosmetic.
How to Evaluate a Contractor's Waterproofing Approach
This is the section most contractor blogs skip — because most contractors don't want you asking hard questions. But if you're spending $10,000–$30,000 on a bathroom remodel, you need to know exactly what you're getting.
Before signing anything, ask these questions:
- What substrate will you use in the wet zone? The answer should be cement board or foam backer. Anything else is a red flag.
- What waterproofing system do you use? They should be able to name a specific product or system (Schluter Kerdi, RedGard, Wedi, etc.) — not just say "we waterproof it."
- Do you apply membrane to the full shower wall surface, or just the seams and corners? Full surface is correct. Seams-only is inadequate.
- How do you detail the inside corners and the curb? Shows whether they understand the failure points.
- What shower pan system do you use? And: how is the liner tied into the drain body?
- Can I see the waterproofing before tile goes up? A confident contractor will say yes without hesitation.
- Do you pull permits for bathroom work? In Louisville/Jefferson County, plumbing, electrical, and structural changes require permits. A contractor who skips permits is cutting corners somewhere.
- What's your warranty on labor? And specifically: does it cover water damage resulting from installation?
PRO TIP: If a contractor gets vague or evasive when you ask about waterproofing specifics, that tells you something important. An experienced remodeler who does this correctly is proud of the process — they'll walk you through it without prompting.
DIY vs. Professional Waterproofing: An Honest Take
Can you waterproof a bathroom yourself? For small repairs — sealing grout, applying a liquid membrane to a shower niche — yes, with the right products and careful prep.
For a full bathroom remodel, the honest answer is: it depends on your skill level and your tolerance for risk. The waterproofing step itself isn't technically complex, but the details matter enormously. A missed inside corner, a thin spot in the membrane, a pan liner installed at the wrong slope — these aren't things you'll see when the tile is up. You'll only find out about them years later when the damage is already done.
In Louisville's older housing stock — homes built before 1980 — there's an additional layer of complexity. Opening up bathroom walls often reveals galvanized pipes nearing the end of their lifespan, outdated electrical, or framing issues. Knowing how to handle those discoveries, and when to call a plumber or electrician, is part of what you're paying for when you hire an experienced local contractor.
For most homeowners, professional installation isn't just about the waterproofing — it's about having someone who knows what they're looking at when they open the walls.
FAQ
Is tile waterproof on its own?
No. Tile is water-resistant, but grout absorbs water over time. Bathroom tile waterproofing relies on the membrane system behind the surface — not the tile itself. Without it, water penetrates the substrate and causes structural damage.The tile is the finished surface — the system behind it is what actually stops water.
How long does bathroom waterproofing last?
A properly installed waterproofing system should last 20–30 years or more. Failures typically occur within 2–5 years when installation was done incorrectly — wrong substrate, incomplete membrane coverage, or improper pan liner detailing.
Can you waterproof over existing tile?
In some cases, yes — liquid-applied membranes can be applied over sound, clean tile before re-tiling. But if the existing tile shows signs of moisture damage, hollow spots, or substrate failure, the tile needs to come off first to assess and repair the underlying system.
What is a shower pan liner?
A shower pan liner is a continuous sheet of flexible material (typically PVC or CPE) installed under the shower floor tile. It slopes toward the drain and wraps up the curb walls to prevent water from reaching the subfloor. It's one of the most critical — and most commonly skipped — components of shower construction.
How do I know if my shower is leaking behind the walls?
Signs include hollow-sounding tile, grout cracking at floor-wall junctions, musty odor, soft flooring near the shower base, mold at the curb or base of walls, or efflorescence (white mineral deposits) on tile surfaces. If you suspect a leak, a moisture meter test by a contractor can confirm it without demolition.