
Gutter Guard Installation in Louisville, KY: The Homeowner’s Guide to Shurflo Protection

Pat McIntyre • September 10, 2026

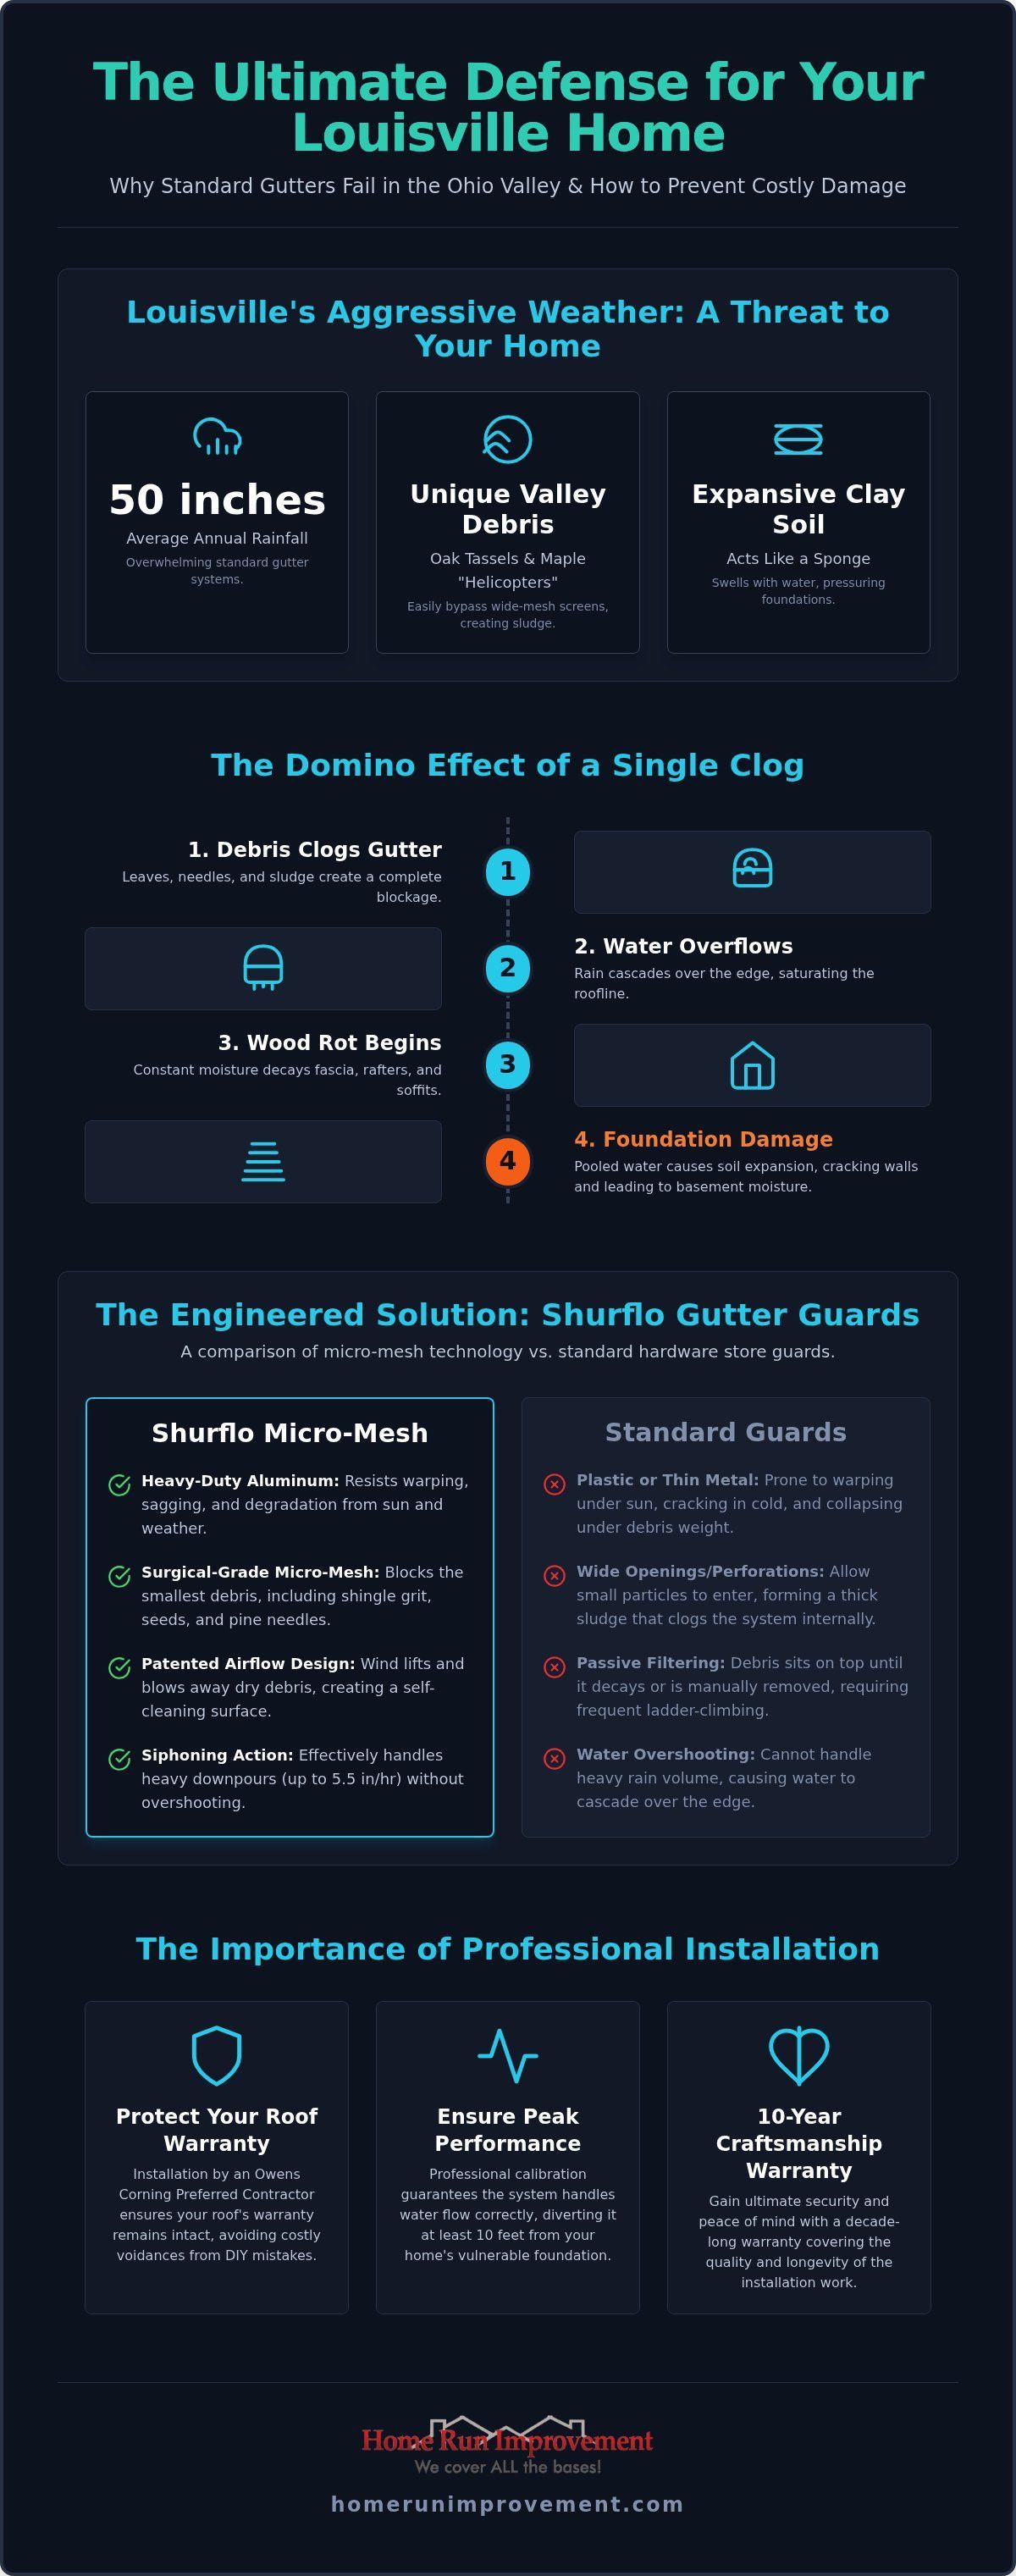
If you believe the greatest threat to your property is a passing thunderstorm, you're overlooking the silent damage accumulating just above your head. In a city that sees nearly 50 inches of annual rainfall according to NOAA climate data, a clogged gutter isn't just a nuisance; it's a direct invitation for foundation erosion and basement flooding. You shouldn't have to risk a life-altering fall from a ladder just to clear out the endless debris from local Oak and Maple trees. We understand the anxiety that comes when the clouds darken over Jefferson County, especially when you know your downspouts are struggling to keep up.

By choosing professional gutter guard installation Louisville KY, you're not just buying a product; you're investing in a permanent structural defense. This guide will demonstrate how the Shurflo system protects your home from water damage without compromising your roofing warranty. When you prioritize precision engineering over DIY fixes, you ensure your home remains dry and your weekends remain yours. We'll examine the technical advantages of micro-mesh technology and why professional calibration is the only way to achieve true peace of mind during a heavy Kentucky downpour.

Key Takeaways

  • Identify the specific Louisville climate risks, including the high precipitation rates documented by the National Weather Service, that threaten your home's foundation.
  • Explore the technical advantages of Shurflo micro-mesh technology and how it uses natural airflow to keep your system maintenance-free without the need for ladder climbing.
  • Discover why professional gutter guard installation Louisville KY is essential for preventing wood rot and basement moisture issues caused by clogged downspouts.
  • Understand the importance of choosing an Owens Corning Preferred Contractor to ensure your gutter system integration doesn't void your roof's warranty.
  • Learn how a 10-year craftsmanship warranty from a local expert provides the ultimate security for your home's exterior and long-term stability.

Why Louisville Homes Require Specialized Gutter Protection

Louisville's weather isn't just unpredictable; it's aggressive. If your gutter system fails during a typical Kentucky spring, the consequences start at your roofline and end at your foundation. Most homeowners view gutters as a simple drainage tool, but they're actually your home's primary defense against structural decay and long-term instability. When water isn't managed correctly, it doesn't just disappear; it finds the path of least resistance into your home's framework.

According to local climate data, Louisville averages nearly 50 inches of rain per year. This volume is often delivered in high-intensity bursts that quickly overwhelm generic screen guards. When water overflows because of a clog, it saturates the fascia board and roof rafters. This constant moisture increases the risk of wood rot, which can compromise the integrity of your entire roofing system before you even notice a leak inside.

It's not just the water that causes issues; it's the specific biological load of the Ohio Valley. Local foliage presents a unique challenge that standard hardware store filters can't handle. Oak tassels and Maple "helicopters" are notorious for bypassing wide-mesh screens. Once inside, they decay into a thick sludge that creates blockages nearly impossible to clear without professional intervention. To maintain a functional home, you need a system designed for the Science of Clog-Free Performance.

The Environmental Impact of the Ohio Valley

In heavily wooded neighborhoods like Anchorage and Glenview, pine needles pose a distinct threat. These thin, sharp needles pierce through most guards, creating a "bird's nest" effect that traps other debris. If your gutter guard installation Louisville KY doesn't account for these micro-debris types, you'll still find yourself on a ladder twice a year. High-intensity rainstorms in our region require a guard that can handle rapid water intake while simultaneously shedding these stubborn needles. We've seen hundreds of homes where "guaranteed" systems failed because they weren't engineered for our local tree density.

Foundation Risks Specific to Louisville Soil

Kentucky soil is rich in expansive clay, which behaves like a sponge. When this clay absorbs excessive water from overflowing gutters, it swells and puts immense pressure on your basement walls. If you don't move water at least 10 feet away from your home, you're inviting foundation cracks and chronic basement moisture. Professional gutter guard installation Louisville KY ensures that water is captured and diverted properly every single time. Ignoring these signs often leads to the hidden dangers of incorrect gutter installation, which eventually results in five-figure foundation repair bills. A proactive approach to gutter protection is the only way to safeguard your home's structural footprint.

Shurflo Gutter Guards: The Science of Clog-Free Performance

Shurflo is not a simple screen or a temporary retail insert. It's a professional-grade micro-mesh system engineered to filter out everything from heavy branch debris to the finest shingle grit. While big-box retailers sell plastic inserts that warp under the intense Kentucky sun, Shurflo utilizes a heavy-duty aluminum construction that maintains its shape for decades. If you choose a metal-based system, you avoid the common pitfalls of sagging and collapsing that plague cheaper alternatives. This durability is essential for any gutter guard installation Louisville KY, where our fluctuating temperatures can quickly degrade inferior materials.

The true genius of the Shurflo system lies in its patented technology. It uses natural airflow to keep the surface clear. As wind moves across the low-profile guard, it creates a vortex that lifts and blows away dry leaves and debris. This self-cleaning mechanism ensures that the system remains functional without constant manual intervention. Because the guards sit flush with your gutters, they don't disturb your roof's aesthetic or create an unsightly "hump" at the roofline. They integrate seamlessly, providing a clean, finished look that enhances your home's curb appeal.

Micro-Mesh vs. Perforated Aluminum

Many systems use wide perforations that allow small seeds and shingle granules to pass through. Once these particles enter the gutter, they combine with moisture to form a sludge that promotes organic growth. Shurflo's surgical-grade micro-mesh is designed to block these microscopic contaminants. This level of filtration meets the rigorous standards often discussed in independent gutter protection testing. By preventing organic buildup, you eliminate the risk of internal gutter corrosion and the foul odors associated with stagnant debris.

How Shurflo Handles Heavy Kentucky Downpours

Louisville's maximum hourly rainfall rate can reach 5.5 inches, a volume that would cause most guards to "overshoot," sending water cascading over the edge. Shurflo solves this with a unique siphoning action. The mesh surface breaks the water's tension, pulling it into the gutter even on steep-slope roofs. Managing this runoff is a core part of Specialized Gutter Protection, as it prevents the soil saturation that threatens your foundation. Our Professional Gutter Guard Services ensure that every panel is calibrated to handle these high-velocity events. If you're tired of seeing water bypass your gutters during spring storms, request a technical consultation to see how Shurflo manages heavy volume.

Professional Installation vs. DIY: Protecting Your Roof Warranty

Many homeowners view gutter guards as a simple weekend project, but this assumption often leads to expensive long-term consequences. If you install a guard incorrectly, you risk more than just a leaky gutter; you risk voiding your entire roofing warranty. Most high-quality roofing systems, specifically those from Owens Corning, require strict adherence to installation standards that protect the integrity of the shingles. When an amateur tucks a guard under the first course of shingles, they can break the sealant bond or damage the starter strip, leaving your roof vulnerable to wind uplift and water infiltration.

Structural integration is the difference between a system that works and one that fails. A professional gutter guard installation Louisville KY ensures that the guard is calibrated to your home's specific roof pitch and gutter size. If the guard isn't aligned perfectly with your gutter installation Louisville KY, water will simply overshoot the mesh during a heavy rain, defeating the purpose of the investment. We see this frequently with store-bought parts that aren't designed for the high-velocity runoff common on steep Kentucky roofs.

Safety remains the most immediate concern. According to data from the Centers for Disease Control and Prevention, falls from ladders are a leading cause of emergency room visits for homeowners. Hiring a fully insured contractor eliminates this personal liability. You shouldn't have to risk your physical well-being for routine maintenance. When you choose a professional service, you aren't just buying a product; you're securing a result that is backed by professional accountability and proper insurance coverage.

The Owens Corning Preferred Contractor Advantage

As an Owens Corning Preferred Contractor, we understand the chemistry of your roof. We ensure that your Shurflo guards are installed without lifting or damaging the shingles. This expertise is critical for maintaining your manufacturer's coverage. If a non-certified installer damages your roof during a gutter project, the manufacturer won't cover the resulting leaks. You can learn more about how we protect your home's exterior through our specialized Roofing Services Louisville.

Why a 10-Year Craftsmanship Warranty Matters

A store-bought guard comes with a limited product warranty, but it offers zero protection if the installation itself fails. We provide a 10-year craftsmanship warranty on every project we complete. This promise creates a level of peace of mind that a DIY project simply can't match. If a panel shifts or a seal fails during a storm, we take responsibility for the fix. This long-term accountability is the hallmark of a local expert who cares about the community's structural health.


The Installation Process: What to Expect from Home Run Improvement

Professionalism in home exterior work is defined by a methodical, transparent process. If you're investing in gutter guard installation Louisville KY, you deserve a sequence of events that treats your home as a complete, integrated system. We don't simply snap panels into place and leave. Our approach is designed to eliminate the common industry pitfalls that lead to system failure and homeowner frustration. Every project begins with a comprehensive audit of your existing drainage to ensure the foundation is sound before any protection is applied.

Step 1: Gutter System Optimization

Putting guards on a failing gutter is a classic "Protective Expert" anti-pattern that we strictly avoid. Before the Shurflo panels are even unpacked, we perform a deep cleaning and structural tune-up. We inspect every linear foot for sagging, loose hangers, and incorrect pitch. If your gutters aren't sloped correctly, water will pool and breed mosquitoes regardless of how clean the guards are. We repair loose spikes and adjust the pitch to ensure proper water runoff. In cases where the existing metal is too thin or damaged to support a guard, we may recommend a full Gutter Installation and Replacement to provide a stable base for your new protection system.

Step 2: Precision Micro-Mesh Fitting

Once the gutters are optimized, we begin the custom fitting of the Shurflo panels. This isn't a "one size fits all" application. Each panel is precision-cut to match the unique angles of your roofline, especially in complex areas like valleys and miters where water volume is highest. We secure the shurflo gutter guards using a specialized attachment method that does not penetrate your roof deck or lift your shingles. This is vital for maintaining your manufacturer's warranty. We've completed hundreds of these technical fits in neighborhoods from Jeffersontown to Prospect, ensuring that even the most intricate architectural details are fully protected. Following InterNACHI standards for exterior drainage, we verify that every connection point is seamless and secure.

The final stage is the flow test. We don't consider the job done until we've simulated a heavy downpour using a high-volume water test. We watch the water enter the mesh, travel through the gutter, and clear the downspouts without any overshooting or leaking at the seams. This rigorous inspection ensures that your home is ready for the next Kentucky storm before our crew leaves the driveway. We take personal responsibility for the performance of the system, treating your property with the same precision we would our own.

Schedule your precision installation today

Choosing a Local Louisville Expert for Your Gutter Guards

Choosing a local contractor is about more than just convenience; it's about accountability. National firms often rely on a revolving door of subcontractors who may not be in business when you need a warranty repair in five years. When you invest in gutter guard installation Louisville KY with a neighborly expert, you ensure that the person who installs the system is the same one who stands behind the 10-year craftsmanship warranty. We live in these communities, from the historic streets of Anchorage to the growing neighborhoods in Crestwood. This local presence means your curb appeal and home value are personal to us. You can verify our standing as a dependable local fixture through the Better Business Bureau of Louisville.

One Partner for Your Entire Exterior

Managing your home's exterior through a single, specialized partner creates a level of efficiency that fragmented projects can't match. Your roof, siding, and gutters work as a unified shield. For instance, high-performance Siding Services Louisville are only as effective as the drainage above them. If your gutters overflow, the constant splash-back can lead to premature wood rot and staining on your exterior walls. By coordinating your gutter protection with products like LP SmartSide siding, you eliminate these vulnerabilities before they become costly repairs. This holistic approach ensures that every component is calibrated to protect the others, providing a seamless defense for your property.

Schedule Your Free Louisville Estimate

Don't wait for the heavy saturation of the next Kentucky spring to test your home's defenses. Securing your property for 2026 starts with a technical evaluation of your current system. We've built our reputation as a "Protective Expert" by providing honest, assertive guidance on what your home actually needs to stay dry and stable. You can research local building standards and rainfall management through the Louisville Metro Government website to understand why precision matters. When you're ready to stop climbing ladders and start protecting your foundation, Contact Home Run Improvement for a comprehensive, free estimate. We'll provide the specialized knowledge and long-term stability your Louisville home deserves.

Protect Your Louisville Home's Structural Integrity

Effective water management is the most critical investment you can make for your property's longevity. By integrating Shurflo's micro-mesh technology, you replace the dangerous cycle of ladder-climbing with a permanent, self-cleaning solution. We've seen how the high-intensity rainfall in the Ohio Valley can compromise foundations; professional gutter guard installation Louisville KY prevents these structural failures before they begin. When you choose a locally owned business that is also an Owens Corning Preferred Contractor, you ensure your roof warranty remains intact while gaining a system calibrated for our specific local foliage.

We stand behind every project with a 10-year craftsmanship warranty because we believe in the precision of our work and the resilience of your home. You deserve the peace of mind that comes from knowing your basement will stay dry during the next heavy Kentucky downpour. It's time to stop reacting to clogs and start proactively defending your home's exterior with a partner who treats your property as their own.

Secure Your Foundation with a Free Gutter Guard Estimate

Take the first step toward a maintenance-free exterior and a more secure home today. Our team is ready to provide the specialized protection your Louisville property requires.

Frequently Asked Questions

Are gutter guards actually worth it for Louisville homeowners?

Yes, gutter guards are a vital investment for Louisville homes due to our average annual precipitation of nearly 50 inches. Without them, your foundation is at constant risk from overflowing water. Beyond structural protection, they eliminate the need for dangerous ladder work. According to the Centers for Disease Control and Prevention, falls from ladders are a leading cause of home injuries. We ensure your gutter guard installation Louisville KY provides long-term stability and safety.

Will Shurflo gutter guards void my roofing warranty?

No, Shurflo guards will not void your warranty when installed by a certified expert. As an Owens Corning Preferred Contractor, we use installation methods that don't penetrate or lift your shingles. Many DIY products require tucking under the first course, which breaks the sealant bond. Our professional-grade approach maintains the integrity of your roofing system while providing a seamless drainage solution that meets all manufacturer specifications for warranty compliance.

How often do I need to clean gutters that have guards installed?

You'll rarely need to touch your gutters again. Shurflo's patented technology uses natural airflow to blow dry leaves and debris off the mesh surface. While no system is 100% maintenance-free forever, this micro-mesh design significantly reduces the cleaning frequency compared to open gutters. InterNACHI standards suggest that even with guards, a quick ground-level visual inspection once a year is a best practice to ensure your downspouts remain clear of any ground-level obstructions.

Can Shurflo guards handle the heavy rain we get in Kentucky?

Absolutely. Shurflo systems are engineered with a unique siphoning action that pulls water through the mesh even during high-velocity downpours. In Louisville, the maximum hourly rainfall rate can reach 5.5 inches, according to National Weather Service data. While generic screens often cause water to "overshoot," Shurflo's surgical-grade mesh breaks the water's surface tension. This ensures every drop is captured and diverted safely away from your home's foundation and siding.

Do gutter guards cause ice dams during Louisville winters?

Gutter guards themselves do not cause ice dams. These issues are typically the result of poor attic insulation and heat loss through the roof deck. When snow melts and refreezes at the gutter line, it creates a dam. Proper gutter guard installation Louisville KY ensures that the guard doesn't interfere with your roof's natural thermal performance. For more information on preventing winter roof damage, consult the Energy Star guide on ice dams.

What is the difference between micro-mesh and the guards sold at hardware stores?

The primary difference is durability and filtration. Hardware store guards are often made of plastic that warps or thin mesh that allows small seeds and shingle grit to pass through. Shurflo uses a heavy-duty aluminum frame and surgical-grade stainless steel mesh. This combination prevents organic growth inside the gutter and resists the extreme temperature fluctuations of the Ohio Valley. Citing the Science of Clog-Free Performance, professional systems offer superior resilience over retail alternatives.

How long does the professional installation process take?

Most residential projects are completed within a single day. Our process is methodical, beginning with a full cleaning and structural tune-up of your existing gutters to ensure they are pitched correctly. Once the foundation is ready, we precision-fit the Shurflo panels to your home's specific roofline. This efficient timeline allows you to secure your home's exterior without a prolonged construction presence. We respect your property and follow BBB Louisville standards for professional conduct and site cleanliness.

Does Home Run Improvement offer a warranty on gutter guard installation?

Yes, we provide a fixed 10-year craftsmanship warranty on every installation. This covers the labor and precision of the fit, ensuring your system performs as promised. Additionally, the Shurflo product itself comes with a 25-year transferable manufacturer warranty. This double layer of protection gives you peace of mind that your investment is secure. If you have questions about specific coverage details, you can review our 10-year warranty policy to see how we prioritize local accountability.

By Pat McIntyre • October 22, 2026
LP SmartSide siding has an expected lifespan of 20-30 years, but longevity isn’t the only measure of value. When weighing LP SmartSide siding cost per square foot in Kentucky , compare the full project scope, expected upkeep, and how the material stacks up against vinyl and fiber cement. It’s reasonable to look for siding that can handle the years ahead without creating a demanding maintenance routine. LP SmartSide is typically repainted every 8-12 years, while vinyl has an expected lifespan of 20-30 years. The right comparison depends on what matters most for your home: long-term performance, appearance, upkeep, or the work required to install each material. This guide explains what affects LP SmartSide siding cost per square foot in KY, what to consider about the product’s lifespan and maintenance, and how it compares with vinyl and fiber cement. Use these factors to weigh the options and decide which trade-offs suit your home. Key Takeaways LP SmartSide’s expected lifespan is 20-30 years, but proper installation and ongoing care matter to long-term performance. Trim, accessories, and removing existing siding can add to the scope of a replacement project, so account for them when comparing estimates. For a 1,500-square-foot siding project, the final total depends on more than the home’s size; design details and installation requirements also affect the work. LP SmartSide, vinyl, and fiber cement differ in maintenance needs and other trade-offs. Compare those alongside lifespan to find the right fit for your home. Costs can vary by project and location. Use the article’s comparison and decision guide to understand which factors matter for homes in Kentucky. How long does LP SmartSide siding last? LP SmartSide siding has an expected lifespan of 20-30 years. Its limited warranty lasts 50 years, with 100% coverage during the first five years and prorated coverage for 45 more years. A separate 5-year labor warranty is also listed. Read the warranty terms alongside expected lifespan: they describe different protections and don’t make the material maintenance-free. Kentucky permit and building-code requirements depend on the property’s location and project scope. Installation must meet the requirements that apply to the home. To compare siding materials and durability, watch this video: https://www.youtube.com/watch?v=bEeOArpmc9A LP SmartSide is engineered wood siding made from treated wood strands combined with waxes and resins. Its SmartGuard treatment helps protect panels against the elements. Lifespan also depends on installation quality, moisture management, and upkeep. For example, repeated water exposure at siding edges or joints can undermine an otherwise durable exterior. Plan for the complete siding system, not just the visible panels. Trim, accessories, house wrap, fasteners, and paint all affect the work and budget. Removing old siding adds labor and debris disposal. The type and condition of the existing siding influence removal needs, while the home’s layout affects installation time. Complex corners, upper stories, and difficult access can require more labor than straightforward, single-story walls. Professional installation typically takes 1-2 weeks, with another week if painting is required. Labor commonly accounts for 50-60% of a siding project’s total cost. That share helps explain why installation details matter: careful fitting, flashing, fastening, and finishing are essential parts of the project, not optional extras. Vinyl siding installation is another option to compare when reviewing the scope of work. OptionExpected lifespanMaintenance or installation considerationLP SmartSide20-30 yearsPaint upkeep and careful moisture managementVinyl siding20-30 yearsCompare its upkeep and installation needs with the project scope Choose by weighing expected lifespan, finish preferences, upkeep, and the condition of your existing walls. Then compare estimates that clearly specify removal, trim, accessories, painting, and installation labor. What determines LP siding installation cost? Project totals depend on the siding area, material choices, and any work the exterior needs before installation. Compare estimates by scope, not by home floor area alone. Project Totals for a 1,500-Square-Foot Siding Project A 1,500-square-foot siding area gives a useful comparison point, but it isn’t necessarily a 1,500-square-foot home. Floor area and exterior wall area measure different things. The price depends on the project and is provided after a quote request. Review whether the estimate includes panels, trim, accessories, removal, disposal, and painting, so the total reflects the same scope of work. Engineered wood siding and fiber cement differ in materials and installation requirements. Compare the selected products and the labor required to install them, rather than totals that cover different work. Cost Estimates by Home Size Home-size estimates are most useful when they identify the siding area being measured. A home with 1,500 square feet of floor space may have a different exterior wall area from another home of the same size. Wall height, layout, gables, and openings affect the amount of siding and cutting required. For a practical comparison, use the measured exterior siding area, then review each estimate’s inclusions. Larger examples, such as homes with 2,000 or 4,000 square feet of siding, require more panel coverage than a 1,500-square-foot siding project. Their totals don’t necessarily rise in a straight line because design and installation conditions vary. Costs Across Kentucky Cities A city name alone doesn’t establish a project total. The siding area, condition of the existing exterior, and installation complexity all affect the scope, whether the home is in Louisville, Lexington, or Bowling Green. For a fair local comparison, assess the same factors in each estimate: measured wall area, panel selection, trim, old siding removal, disposal, painting, and access. Tall walls or a complex exterior can require different work from a simple design, even in the same city. Across Kentucky, panel quantities depend on measured wall area, while installation work depends on the home’s design and condition. Removing existing siding adds work; an exterior in good condition may need a different preparation scope. Gables, corners, openings, and upper stories also affect how panels are cut and fitted. Before comparing estimates, check that each describes the same material, measured area, preparation, and finishing. If one includes removal and painting while another excludes them, the totals aren’t comparable. Ask for a scope that lists panels, trim, accessories, and any exterior repairs separately. This makes it easier to identify what is driving the project budget. To discuss a Kentucky siding project, send the measured siding area and relevant exterior details through the project inquiry form . Does LP SmartSide require a lot of maintenance? LP SmartSide needs periodic attention, especially to its painted finish. Homeowners should expect repainting every 8-12 years, though exposure and finish condition affect timing. That interval makes maintenance part of the long-term budget, not a task to ignore after installation. Compare the repainting cycle with your preferred appearance and willingness to maintain painted wood siding. Durability starts with the product’s construction. LP SmartSide is engineered wood made from treated wood strands, waxes, and resins. Its panels use LP’s SmartGuard process for protection against the elements. These features help protect against environmental exposure, but do not eliminate the need to monitor the siding or maintain its finish. A practical maintenance routine focuses on visible changes and places where water can collect. During regular exterior walk-arounds, look for peeling paint, damaged edges, loose trim, and debris near siding joints. Addressing small issues promptly can help prevent more extensive repairs. Keep landscaping and stored items from trapping moisture against the wall. Inspect the finish: Look for fading, peeling, or bare areas that may need attention before the next repainting cycle. Check edges and joints: Note damaged panels, trim, or places where water may sit. Keep surfaces clear: Remove dirt and debris carefully, without damaging the painted finish. Track maintenance: Record painting and repair dates so the 8-12-year repainting interval stays visible. Finish coverage depends partly on the product option. Primed panels require painting after installation, while LP SmartSide ExpertFinish has a factory-applied coating with a 15-year warranty. That warranty applies to the coating, not every part of the siding system. The product also has a 5-year finish warranty and a 50-year limited substrate warranty. Review the applicable warranty terms for coverage details and conditions. Base painting on the surface condition and product requirements, not just a calendar reminder. A sound finish preserves appearance, while worn or peeling paint signals that maintenance may be due. If a repair affects multiple panels, assess nearby trim and joints too, so the finished exterior remains consistent. LP SmartSide combines engineered wood with periodic finish care. Homeowners considering a factory-finished option can weigh ExpertFinish’s coating warranty against primed panels that need painting. Either way, factor inspections, upkeep, and eventual repainting into your siding comparison. Comparison with vinyl and fiber cement LP SmartSide, vinyl, and fiber cement each have different considerations for finish, upkeep, and installation. Compare the complete exterior project, not just the material name. Proper installation matters for all three: fit, joints, and water management affect how siding performs through changing weather. LP SmartSide is engineered wood made from treated wood strands combined with waxes and resins. Its appearance may suit homeowners seeking a wood-like finish, but painted surfaces need periodic care. The panels use the SmartGuard process for protection against the elements. This treatment doesn’t eliminate the need to protect cut edges and maintain the finish. Vinyl offers a different maintenance profile because it doesn’t rely on a painted finish. Its expected lifespan is 20-30 years, though it can last as little as 10 years in some areas. LP SmartSide’s expected lifespan is also 20-30 years. Those ranges overlap, so a lifespan estimate alone won’t settle the choice. Consider how each material’s appearance and upkeep fit your home. Fiber cement provides another alternative, but its installation can involve heavier materials. Some LP SmartSide projects can be completed up to 30% quicker than projects using heavier alternatives such as fiber cement. That comparison concerns project speed, not a guaranteed schedule for every home. Wall layout, access, and preparation still shape the work. OptionExpected lifespanFinish and upkeepInstallation considerationLP SmartSide20-30 yearsPainted finish; periodic maintenanceEngineered wood panels; proper installation and moisture management matterVinyl20-30 years; as little as 10 years in some areasDoesn’t rely on a painted finishCompare the home’s layout and preparation needsFiber cementNot compared hereCompare finish and maintenance needs for the product selectedHeavier material may affect installation time For all three materials, the budget depends on siding area, preparation, installation details, and finish choices. The project price depends on the home and is provided after a quote request. Termites may also factor into comparisons of wood-based products. LP SmartSide is engineered wood, so consider its product-specific protection and installation requirements rather than assuming all siding materials respond the same way. Moisture control is another practical comparison point: assess how each option handles joints, edges, and water exposure. Choose LP SmartSide if its wood-like appearance and maintenance needs suit your priorities. Consider vinyl if avoiding periodic repainting matters most. Compare fiber cement if you’re prepared to account for its heavier installation demands. Weigh durability, finish, upkeep, and project scope together. How do LP SmartSide costs vary across Kentucky cities such as Louisville, Lexington, and Bowling Green City names alone don’t establish project cost, whether you’re comparing Louisville, Anchorage, or Southern Indiana communities. Measured siding area, the existing exterior, material choices, and installation scope determine the work required. A Louisville home with complex wall angles may need a different scope from a simpler Prospect home, even if their floor areas are similar. Use the same comparison method in each location: measure the exterior area receiving siding, then list the included work. For example, a Crestwood estimate should specify whether it includes old siding removal, disposal, trim, accessories, and painting. If a Louisville estimate excludes removal while another includes it, they describe different projects, not a regional price difference. Access and design also affect the work involved. Tall walls, multiple corners, gables, and detailed openings require more fitting and cutting than broad, simple wall sections. A Hurstbourne home with several distinct exterior features may need a more involved installation than a straightforward home elsewhere. Compare the elevations and preparation requirements, rather than relying on an address or bedroom count. Labor is another part of the project calculation. Installation labor generally accounts for a substantial share of siding expenses, so the layout and access matter alongside material quantities. A contractor estimating a Louisville project should account for its particular wall conditions; the same applies when Home Run Improvement works throughout the Louisville metro area and Southern Indiana. A regional average can’t capture those property-level differences. Use this checklist to compare estimates from any of our service areas: Confirm the measured siding area, not just the home’s interior square footage. Compare panel type, trim, accessories, and finish choices. Check whether removal, disposal, and painting are included. Review access, wall complexity, and preparation needs. The project price depends on the home and is provided after a quote request for your LP SmartSide siding cost per square foot KY. Measured exterior area, selected panels, preparation, removal, trim, painting, and installation conditions all shape the estimate. When comparing projects in Louisville, Jeffersontown, and surrounding areas, check whether each estimate covers the same work and materials. This helps distinguish differences in scope from differences in location. For example, two estimates for homes in Clarksville may differ because one includes old siding removal and the other doesn’t. A Louisville estimate may reflect more complex wall geometry than an Indian Hills project. These examples don’t establish a consistent regional premium; they show why each estimate should clearly describe the property and included work. Compare project details across Louisville, Southern Indiana, and local neighborhoods before judging an estimate by location. Matching the measured area, material selection, and included labor gives you a more useful comparison than city names alone. Request a Kentucky siding project estimate Home Run Improvement: LP SmartSide Siding Home Run Improvement installs LP SmartSide siding and vinyl siding, helping Kentucky homeowners compare materials and plan an exterior project. When you’re ready to move from comparing lifespan and maintenance to discussing your home’s siding scope, the team can help. As an Owens Corning Preferred Contractor and LP SmartSide Master Lead, Home Run Improvement backs its craftsmanship with a 10-year warranty. For a useful project discussion, have details ready about your existing siding, the areas to replace, and any trim or painting needs. Those specifics help shape a clear scope without treating a general cost range as a custom estimate. Explore Home Run Improvement’s siding installation service or contact the team to discuss your Kentucky siding project. Make the next siding decision with confidence As you weigh LP SmartSide siding cost per square foot in Kentucky, consider how the choice will suit your home over time. Your priorities may shift: appearance could matter most now, while simpler upkeep becomes more important later. Choose siding that fits both the exterior you want today and the care you’re prepared to provide. Before moving forward, gather the details that make your project specific: the areas you want to update, the exterior’s current condition, and your preferred finish. Clear priorities make it easier to discuss material options and understand the proposed scope. If you’re deciding between LP SmartSide and vinyl, include both in the conversation. A thoughtful plan starts with your home, not a one-size-fits-all answer. Home Run Improvement can discuss the siding work that fits your goals and help you take the next step. Contact Home Run Improvement Move ahead at your pace, with a clearer sense of what matters for your home. Frequently Asked Questions How Much Does LP SmartSide Cost in 2026? There isn’t one project total for every Kentucky home in 2026. The estimate depends on measured siding area, panel selection, painting, trim, removal, and preparation work. A simple wall layout and a home with multiple gables require different scopes. Share your project details when requesting a quote so the estimate reflects the materials and work involved. Is LP SmartSide More Expensive Than Vinyl? The answer depends on the materials and installation scope being compared. Vinyl and LP SmartSide differ in finish and maintenance, and project totals can change with removal, trim, painting, and wall complexity. Compare estimates covering the same exterior area and preparation. Otherwise, a lower total may simply exclude work included in another estimate. What is the average installed cost per square foot for LP SmartSide siding in Kentucky? There isn’t one average installed cost that describes every Kentucky project. LP SmartSide siding cost per square foot in KY depends on measured siding area, selected panels, painting, removal, and installation conditions. A Louisville home with a complex exterior may require a different scope from a simpler property in Lexington or Bowling Green. Compare the same materials and tasks before treating estimates as equivalent. How much does LP SmartSide material cost per square foot in Kentucky? Material cost depends on the panel selection and which supporting materials the project requires. The LP SmartSide siding product is one part of a material list that may also include house wrap, fasteners, trim, and paint. Factory-finished and primed panels involve different finishing choices. For a useful comparison, separate siding materials from labor and list the accessories included in each estimate. What are current LP SmartSide installation labor rates in Kentucky? Labor is specific to each project, not a single statewide rate. Installation scope, wall access, height, architectural details, and preparation all influence the work required. Fitting panels around several gables, for example, takes different labor from covering broad, unobstructed walls. The project price depends on its details and is provided after a quote request; measured area and installation scope shape the estimate. What factors affect LP SmartSide siding installation cost, including home size and siding style? Measured exterior wall area matters more than interior floor area alone. Wall height, gables, corners, windows, and panel style affect material quantities and fitting work. Homes with similar floor areas can have different siding footprints because their shapes and elevations differ. Include the exact walls to be covered and your finish choice when comparing estimates. What additional costs apply for house wrap, trim, flashing, and repairs when installing LP SmartSide? House wrap, trim, fasteners, and paint may be separate parts of the project scope. Clearly identify flashing and repairs when they apply to the exterior work. What’s included depends on the home’s condition and installation details. Ask for an itemized scope showing the preparation, accessories, and finishing tasks included, so you can compare estimates without overlooking necessary work. How does LP SmartSide siding cost compare with vinyl, fiber cement, and wood siding in Kentucky? Compare materials using matching project scopes, then weigh finish, upkeep, and installation needs. Compare LP SmartSide siding cost per square foot in KY with vinyl, fiber cement, or wood only when estimates cover similar work. Vinyl does not require a painted finish, while LP SmartSide needs periodic finish care. Fiber cement is heavier, which can affect installation work.
By Pat McIntyre • October 22, 2026
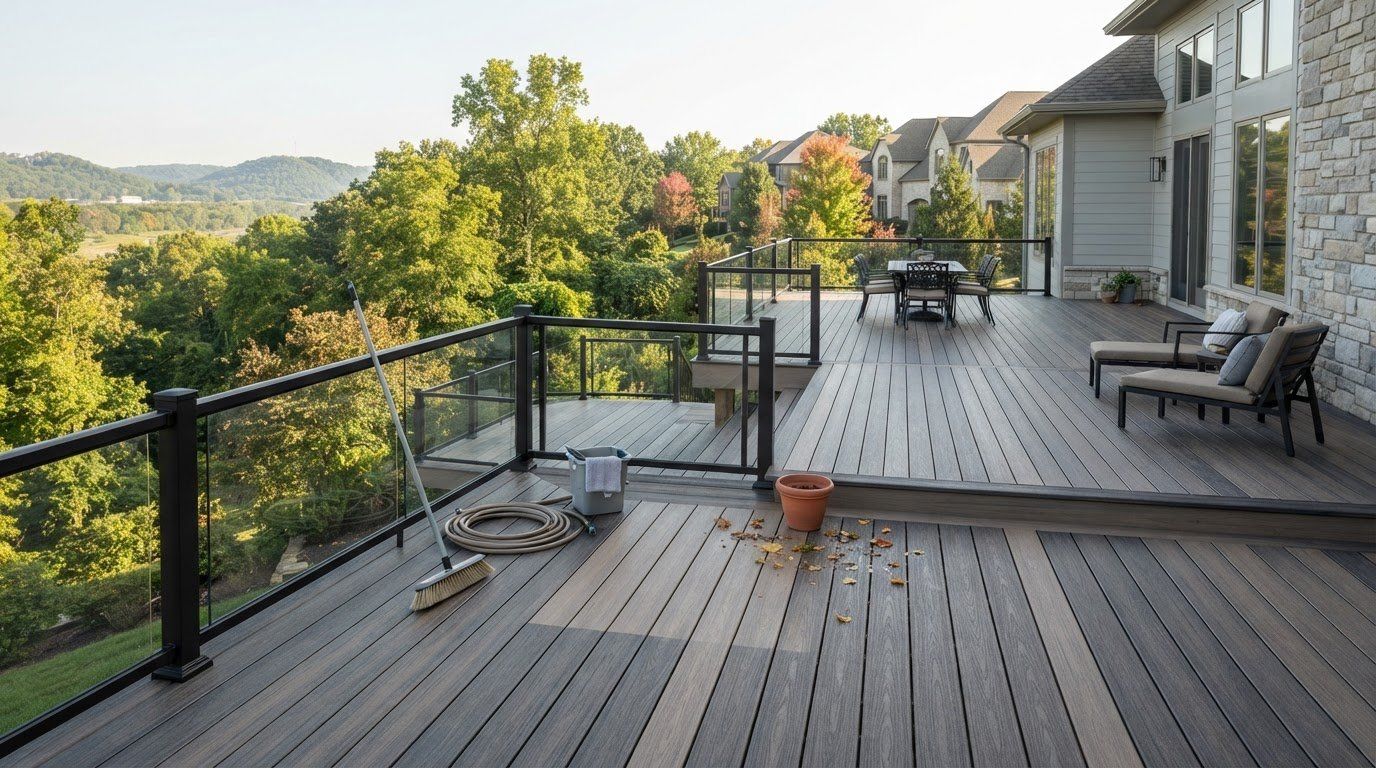
Knowing how to maintain a composite deck starts with one simple rule: follow the care instructions for the exact product installed. Composite boards don’t need the same routine as wood, and a cleaner or tool that works for one brand may damage another. A consistent routine of removing debris, cleaning as directed, and checking for changes helps keep upkeep manageable. Leaves, spills, and seasonal grime are easier to address before they build up. Sweep regularly, use only approved cleaners and tools, and avoid aggressive methods that could harm the surface. TimberTech’s care and cleaning guidance shows why product-specific instructions matter. This guide covers practical steps for routine cleaning, stain prevention, seasonal checks, and recognizing when a concern may need professional attention. Start with your manufacturer’s care instructions, then use the steps below to plan straightforward upkeep. Home Run Improvement provides residential decking services in the Louisville area for homeowners planning a project or addressing a decking concern. Key Takeaways Learn how to maintain a composite deck with a repeatable routine based on the manufacturer’s directions. Clear leaves and spills promptly, and check beneath planters and furniture for hidden debris. Use visible buildup, seasonal changes, and product care recommendations to guide your maintenance schedule. Recognize when persistent damage or movement needs closer attention, and find residential decking help in the Louisville area. How to Maintain a Composite Deck Without Treating It Like Wood Composite decking is designed for lower-maintenance ownership, but it still needs routine care. Leaves, soil, food spills, and everyday foot traffic can leave debris or residue behind. A practical approach to how to maintain a composite deck includes clearing loose debris, cleaning as directed, and checking for seasonal buildup. Don’t assume every board needs the same treatment as traditional wood. Composite boards vary by brand, product line, and manufacturing generation. Materials and surface finishes can affect which cleaners and tools are suitable, so check the care instructions for the exact product installed before choosing a cleaning method. For a visual overview of routine composite deck care, watch this guide: What regular composite deck maintenance actually involves Routine care means removing loose debris, cleaning the surface with approved products and tools, and paying attention to seasonal buildup. Leaves can collect in corners or between boards. Dirt tracked in from the yard and residue from normal use may also need cleaning. Moving outdoor furniture occasionally helps you spot areas where debris has gathered. Surface care is different from repairing loose boards or addressing movement in the deck structure. Cleaning helps keep the surface cared for, but it can’t prevent every scratch, stain, or sign of wear. Low-maintenance decking needs less intensive upkeep, not no maintenance at all. Why the decking brand and product generation matter Before cleaning, identify the decking brand and, if possible, its product line or generation. Keep installation paperwork or product details if available, then consult the manufacturer’s current care instructions for suitable cleaners, brushes, and rinsing methods. Guidance for TimberTech, Trex, and Fiberon products can differ, so one brand’s advice isn’t a universal rule. The material category helps explain why a single cleaning recipe may not fit every board. Wood-plastic composites combine wood fibers or flour with thermoplastics , but surface construction and product formulations vary. The manufacturer’s directions take priority over generic online tips, especially before using a strong cleaner or unfamiliar tool. Keep the distinction simple: low-maintenance means routine care is usually straightforward; no-maintenance would mean care is never needed. Composite decking is low-maintenance, not maintenance-free. Clear seasonal debris, clean as directed when the surface needs it, and treat structural concerns separately from ordinary upkeep. How to Clean Composite Decking: A Safe, Repeatable Routine A careful cleaning process starts before water or cleaner touches the boards. The right product and method depend on the decking manufacturer’s instructions. Don’t assume a cleaner, brush, or washing technique suitable for one deck will work for another. Follow the product’s directions for cleaner dilution, tools, rinsing, and any limits on washing equipment. Prepare the deck before washing Move chairs, tables, planters, and other furnishings carefully so you can reach the full surface. Sweep away loose leaves, dust, and grit first. This helps prevent debris from being scrubbed across the boards and makes it easier to see where cleaning is needed. Check the care instructions for your exact decking product before choosing a brush or solution. Wash, rinse, and let the surface dry Work in manageable sections so you can apply cleaner, scrub as directed, and rinse before residue dries. If the manufacturer recommends testing an approved cleaner in a discreet spot, follow that step before cleaning the full deck. Clear the deck, remove loose debris, prepare the approved cleaner, wash in sections, rinse as directed, and let the surface dry. This sequence is a useful starting point, not a universal recipe. Cleaner concentration, brush type, and washing methods vary by product. Clear the work area. Move furniture and accessories to expose the boards. Take care not to drag heavy items across the surface. Remove loose debris. Sweep the deck and clear accessible gaps so leaves and grit don’t get pushed around during washing. Prepare the approved cleaner. Use only a product permitted by the manufacturer, following its directions for dilution and application. Check product guidance before using a general-purpose “composite deck cleaner.” Wash a manageable section. Use the recommended brush or cleaning method, applying only the pressure and technique specified for your deck. Rinse thoroughly. Remove cleaner and loosened residue according to the manufacturer’s instructions before moving to the next area. Allow the deck to dry. Let the surface dry before returning furnishings, then check for residue or missed spots. Use caution with pressure washing. Some manufacturers permit it under defined conditions, while others recommend a different approach. Follow any limits on pressure, nozzle, or distance exactly. If your product’s care instructions don’t recommend pressure washing, don’t use it as a shortcut. Composite decking materials can differ in composition and development. The American Chemical Society reports research into a composite decking material designed to store more carbon dioxide than its manufacture produces . This is another reason not to assume one cleaning formula fits every product. If cleaning reveals a concern beyond routine surface care, connect with Home Run Improvement about residential decking help . How to Prevent Stains, Scratches, and Seasonal Buildup Preventive care is mostly about noticing what lands on the deck and clearing it before debris collects. Leaves, yard soil, and everyday spills can leave residue if they sit undisturbed. Prompt cleanup won’t prevent every mark, but it can keep ordinary messes from becoming a larger cleaning task. For homeowners in Louisville and nearby communities, seasonal upkeep means responding to what’s on the surface, from fall leaves to winter snow and ice. The right winter cleanup method depends on the decking manufacturer’s guidance. Don’t assume a tool or treatment that suits one board is safe for another. Reduce everyday staining and trapped moisture Wipe up food and drink spills promptly, using a cleaning method approved for your product. Check beneath planters, mats, and furniture from time to time. These items can hide leaves, dirt, or damp debris. Move them carefully and lift furniture rather than dragging it to reduce the chance of scuffing the deck. Keep the spaces between boards and nearby drainage paths clear of accumulated leaves and other loose debris. These areas are easy to overlook during a quick sweep. If residue remains, consult the manufacturer’s instructions before applying a stain treatment or stronger cleaner. Adjust care for Kentucky weather and seasonal debris In fall, remove leaves as they collect, especially around corners, furniture legs, and board gaps. After heavy buildup or severe weather, inspect the surface and clear debris rather than letting it accumulate. A brief check can reveal trapped material or a spill that needs attention. Winter cleanup requires particular care. Before removing snow or ice, review the instructions for your decking brand and product generation. Use them to guide your choice of tools and any products applied to the surface. Don’t assume a metal-edged shovel, abrasive tool, salt, colored ice melt, or other treatment is suitable for all composite decking. For example, TimberTech’s care guidance is intended for its products, not a universal cleaning standard. After a spill: Clean it using the product-specific method rather than reaching for a strong stain remover. During leaf season: Check corners, spaces between boards, and beneath outdoor furnishings. After snow or ice: Follow the manufacturer’s approved removal methods and product guidance. After severe weather: Look for accumulated debris, visible marks, or areas that need attention. A steady prevention routine is more controlled than trying several treatments after buildup has settled in. If you’re unsure whether a cleaner, tool, or winter product is appropriate, consult the current care instructions for your exact deck before using it. This helps protect the surface while keeping seasonal cleanup practical. How Often Should You Maintain a Composite Deck? There isn’t one cleaning calendar that fits every composite deck. A shaded deck beneath trees may collect leaves and debris faster than a more open, lightly used space. To decide how to maintain a composite deck, use visible conditions as your cue and follow the schedule and methods set by the manufacturer. Think in terms of checks, targeted cleaning, and seasonal reviews rather than a rigid schedule. Clean a spill, cluster of leaves, or debris caught in a gap when you notice it. A full surface clean makes sense when the deck looks soiled and the product’s care instructions support it. Build a simple seasonal maintenance checklist During regular outdoor upkeep, scan the boards, gaps, and areas beneath furniture or planters. After a season of outdoor use or when seasonal debris has collected, clear what you find and review the surface. Let conditions guide the timing. The manufacturer’s current care recommendations remain the authority on cleaning methods and product-specific precautions. Debris check: During routine outdoor use, look for leaves, dirt, or material collecting on boards and in gaps. Spot cleanup: Address spills or visible residue when they appear, using care methods approved for your product. Surface review: After seasonal buildup or severe weather, look for persistent marks, visible damage, or areas that need attention. Care guidance review: Before using an unfamiliar cleaner or tool, consult the manufacturer’s instructions for your exact decking product. Use this checklist as a flexible guide, not a substitute for product-specific instructions. Sun exposure, nearby trees, foot traffic, and how the deck is used all affect how quickly debris accumulates. TimberTech’s maintenance guidance, for example, applies to its decking products, not every brand’s schedule or cleaning methods. Know when routine cleaning is not enough Cleaning addresses surface residue; it doesn’t resolve every concern. If a mark remains after you’ve followed approved care steps, don’t escalate to a stronger product or abrasive tool without manufacturer guidance. A persistent stain or visible surface damage may need closer assessment. Note where the concern appears and what you’ve already tried. Loose boards or noticeable movement are different from ordinary appearance issues. They may involve the board attachment or deck framing, which a surface wash can’t assess. Don’t assume the cause or attempt a repair based only on a photo. If the concern involves movement or damage, a professional assessment can help determine what needs attention. Homeowners in Louisville and nearby Southern Indiana communities can explore residential decking services for support with decking concerns. For an assessment of a decking concern, contact Home Run Improvement . When to Get Professional Help for a Composite Deck Routine sweeping and manufacturer-approved cleaning are homeowner maintenance. A concern that remains after proper care, or a change in how the deck feels underfoot, calls for a different kind of attention. Cleaning can improve surface appearance, but it won’t explain why a board is damaged or moving. Notice what has changed before deciding what to do next. A board that shifts, visible damage that persists, or a recurring issue in the same area may call for an assessment. These signs don’t identify a cause on their own, but they are good reasons to look beyond routine upkeep. Signs that call for a closer decking assessment Look for boards that seem loose or move underfoot, visible cracks or other damage, and concerns that return after you’ve followed the manufacturer’s care instructions. Avoid masking a damaged area with stain treatments, strong cleaners, or improvised repairs. These steps can obscure what you’re seeing or introduce another problem. Note where the concern appears and when you first noticed it. Keep the assessment measured. A stubborn surface mark and a moving board aren’t the same kind of issue. The first may remain an appearance concern; the second may warrant a closer look at the board and the deck’s attachment or supporting components. Don’t assume the cause from appearance alone, and don’t treat a photo as a substitute for an on-site evaluation. A local next step for Louisville-area homeowners Home Run Improvement offers professional decking services for residential deck concerns in Louisville and nearby Southern Indiana communities. A closer assessment can help distinguish a surface issue from a concern involving movement or visible damage, and clarify what deserves attention next. The appropriate next step depends on the deck’s condition, not on a cleaning shortcut. Knowing how to maintain a composite deck includes recognizing when a concern falls outside ordinary cleaning. If you’ve noticed a persistent problem, share what you’re seeing and where it occurs. Home Run Improvement’s residential decking services provide a local resource for homeowners seeking professional help with their deck. For a professional assessment of a residential decking concern, contact Home Run Improvement . Make Your Next Decking Decision With Confidence A deck concern doesn’t always call for a major project, but it does deserve a clear next step. If cleaning hasn’t resolved a persistent issue, or you’re considering changes to your outdoor space, a professional perspective can help you understand what to address and plan accordingly. Knowing how to maintain a composite deck is useful, and knowing when to bring in experienced help can make the next decision easier. Home Run Improvement is locally owned and operated in the Louisville area, offering residential decking services and free estimates. Whether you’re evaluating a concern or planning a decking project, start with a conversation about what your home needs. Talk with Home Run Improvement about your decking project With clear information and the right support, you can move forward with greater confidence in your outdoor space. Frequently Asked Questions Is composite decking maintenance-free? No. Composite decking is generally lower-maintenance than wood, but it still needs care. Remove debris, clean as needed, and follow product-specific directions. Routine surface cleaning is different from sanding, staining, or sealing. Don’t assume those treatments are necessary or appropriate for every composite product. Board materials and finishes vary by manufacturer and product line, so read the care guidance for your exact decking before applying a treatment or planning upkeep. How often should you clean a composite deck? No single schedule fits every composite deck. Check for leaves, tracked-in soil, and spills, then clean when conditions call for it and follow the manufacturer’s directions. Shade, nearby trees, foot traffic, and outdoor dining can affect how quickly residue builds up. For decks in Louisville, Southern Indiana, Anchorage, Crestwood, Glenview, Hurstbourne, Indian Hills, Jeffersontown, Prospect, Clarksville, Bardstown, and Mt. Washington, seasonal reviews are useful prompts, not fixed rules for how to maintain a composite deck. Can you pressure wash a composite deck? Sometimes, but pressure-washing rules vary by decking product and may set limits on equipment or technique. Before using a pressure washer, consult the current care instructions for your exact product. Don’t assume one setting or approach is safe for every brand. If pressure washing isn’t recommended, use the cleaning method and tools the manufacturer approves instead. This helps keep routine cleanup from causing avoidable surface damage. What is the best cleaner for composite decking? The right cleaner depends on the decking brand, product generation, and residue you’re addressing. Check the product’s care guide before buying or applying a cleaner, since a product labeled for composite decking may not suit every surface. If the manufacturer permits the cleaner, follow its label directions and test it in a discreet area if advised. Don’t mix cleaning products or improvise chemical combinations. Can you use salt or ice melt on composite decking? Winter-product guidance differs by manufacturer, and some de-icers may affect certain decking surfaces. Don’t assume salt or a particular ice melt is safe for every composite deck. Before applying a de-icer, consult the care instructions for your exact product and use only the snow and ice removal methods it permits. If the instructions don’t address a product you’re considering, avoid applying it until you have product-specific guidance. How do you remove a stain from a composite deck? Start by identifying the decking product and checking its cleaning instructions. The appropriate method depends on both the stain and the manufacturer’s guidance, so avoid harsh chemicals or abrasive tools unless the product instructions specifically allow them. Clean a fresh spill promptly using an approved method. If a mark remains after you’ve followed the recommended steps, don’t keep escalating treatments; consider having the concern assessed professionally. Does a composite deck need to be sealed or stained? Don’t assume composite decking needs the same sealing or staining routine as wood. Care requirements depend on the material and surface finish, and an unapproved coating may conflict with the manufacturer’s guidance. Before applying sealant, stain, or another finish, consult the care instructions for the exact decking product. If the product guidance doesn’t call for a coating, stick to approved cleaning and care methods. 
By Pat McIntyre • October 15, 2026
What if the most expensive deck mistake is hidden before the first board goes down? A weak ledger connection, footings planned without considering site conditions, or framing that doesn’t match the decking can create safety risks and costly rework. The common deck building mistakes to avoid often start in the planning stage, long before the finished surface is visible. It’s understandable to focus first on a deck’s size, appearance, and materials. But structural details, product-specific installation instructions, and local requirements matter just as much. Making those decisions early can help protect your home and your investment. This checklist explains which planning, framing, material, and safety issues deserve attention before construction begins. It also covers where project-specific professional judgment matters, including confirming current requirements with your local building department and reviewing applicable guidance from the International Code Council . For homeowners in Louisville, KY, Southern IN, Anchorage, KY, Crestwood, KY, Glenview, KY, Hurstbourne, KY, Indian Hills, KY, Jeffersontown, KY, Prospect, KY, Clarksville, IN, Bardstown, KY, and Mt Washington, KY, careful planning and experienced local workmanship can make the difference between a deck that simply looks finished and one built with stability in mind. Home Run Improvement provides residential decking services to help homeowners plan and build their projects. Key Takeaways Review the plans before construction so the layout, access, and project requirements are clear before work begins. Learn how to spot common deck building mistakes to avoid, and why visible surface issues may point to problems beneath the boards. Compare wood and composite decking based on care expectations and product-specific installation instructions. Use a stage-by-stage checklist to review framing, stairs, guardrails, and finish quality against approved plans and current local requirements. Consider professional planning when the site is complex, structural details are uncertain, or material instructions need careful interpretation. Common Deck Building Mistakes to Avoid Before Construction Begins Many serious deck problems begin as preventable planning oversights, not mistakes made after the boards are installed. A layout that ignores drainage or a plan that doesn’t reflect the site can lead to awkward access, water issues, or expensive changes once construction is underway. Use this early-stage checklist to review key decisions before framing and decking begin. The right details depend on the property, the deck’s design, and the instructions for the selected materials. A general overview of deck structures, uses, and materials is available in the deck (building) Wikipedia article , but it can’t replace project-specific planning. Homeowners in the area can also review Home Run Improvement’s residential decking services in Louisville as they consider project requirements and options. Skipping site assessment, measurements, and a workable layout A deck plan should fit the ground and the way people move through the home. If the yard slopes, water may collect near the house or flow toward the planned deck area. If the layout overlooks a door’s swing, a frequently used path, or an existing step, the finished space may feel cramped or difficult to access. Before settling on a design, record the available dimensions and intended uses. Note door locations, paths, changes in grade, and where water travels during rain. Think through practical details, too: where people will enter the deck, how they’ll move between the house and yard, and whether the layout leaves clear access to areas that need maintenance. These observations give a designer or contractor useful information before the framing plan is finalized. Don’t treat drainage as an afterthought. Consider how the deck’s placement relates to the home and surrounding ground, and flag areas where water already pools or runs. A visual site review can identify questions to resolve before construction, though it isn’t a substitute for professional judgment about grading, structure, or site-specific conditions. Starting without checking current local requirements Permit and building requirements can depend on the property’s location and project details. Before work starts, verify what applies to your specific address with the relevant building department. For Louisville properties, begin with the Louisville Metro Construction Review resources. In Southern Indiana, consult the official building or planning department serving the property’s city or county. Don’t rely on an old project, a neighbor’s experience, or a general online checklist as proof that the same requirements apply to your deck. Ask the responsible authority for current information about permits, plan review, and applicable building requirements. Keep that guidance with your project documents so the design and construction can be planned around it. Confirming requirements early is a practical step, not red tape to handle after materials arrive. Structural Deck Mistakes That Can Weaken the Frame A finished deck surface can look clean and solid while hiding problems in the frame beneath it. The boards don’t strengthen a weak connection or correct supports that weren’t planned for the structure. That’s why common deck building mistakes to avoid include errors in the ledger, posts, beams, footings, and joist layout, even when they aren’t obvious from above. Look for clues, but don’t treat them as a diagnosis. A deck that feels bouncy, has uneven boards, or shows movement may need closer inspection. Those symptoms alone can’t identify the cause. Structural dimensions and connections must follow the approved plans, applicable requirements, and the chosen decking’s installation instructions. Sound framing depends on coordinated supports, connections, and product-specific spacing. Weak ledger connections, beams, posts, and footings The ledger connects the deck to the house, so it must attach to suitable house framing, not simply to siding or another exterior finish. The connection and its protection from water need to be planned together. If the attachment is uncertain, don’t assume that adding visible fasteners will solve the problem. Follow the load path from the ledger and beams through the posts to stable support points. Beam-to-post connections should match the approved design, and footings should support the structure as planned. If you see shifting, separation, sagging, or signs of decay, treat them as reasons to seek a qualified assessment, not proof of one specific defect. The North American Deck and Railing Association (NADRA) guidelines offer additional safety and education resources for homeowners. Incorrect joist spacing, alignment, and blocking Joist spacing isn’t a one-size-fits-all measurement. It depends on the decking product, installation pattern, and manufacturer’s instructions. If framing is laid out for a different product or pattern, boards may not have the support the installation requires. Review the selected product’s current instructions before framing is complete, and keep the guidance with the project documents. For a product-specific example, TimberTech’s published guidance calls for blocking at intervals of 4 to 6 feet in relevant applications. That’s TimberTech guidance, not a universal rule for every deck. Follow the instructions for the actual decking system and approved plans. See TimberTech installation guides for product-specific details. Check that joists run in the intended direction, remain aligned, and provide consistent support where boards meet or the layout changes. TimberTech’s guidance also specifies joist spacing based on the product: spacing should not exceed 16 inches on center, while TT and Advanced PVC Max boards can allow up to 24 inches on center. Closer spacing of 12 inches or less can create a more rigid feel. These details are product-specific, so follow the instructions for the decking you select. If the existing frame or house attachment is uncertain, get professional judgment before covering it with decking. A careful framing review is easier while connections are still visible. Homeowners planning a Louisville-area deck can learn more about Home Run Improvement’s decking services . Decking, Fastener, and Water-Management Mistakes to Catch The right deck surface is the one that fits your priorities and can be installed correctly on the planned frame. Wood and composite decking differ in appearance, care expectations, and installation instructions. Wood may need periodic cleaning and protective finishes, depending on the product and exposure. Composite has its own care requirements and isn’t maintenance-free by default. Compare the upkeep you’re comfortable with alongside the look and feel you want. Don’t select boards by appearance alone. Different products and board profiles can require different framing details, spacing, fastening methods, and edge clearances. If you choose the decking after the frame is built, the structure may not match the installation requirements. Review those instructions while planning, then make sure the framing and materials are coordinated. Homeowners considering a Louisville-area project can include Home Run Improvement’s residential decking services in their material planning. Choosing decking without considering installation requirements Compare the expected upkeep, appearance, and installation guidance for each option before settling on a material. Check instructions for the specific product, not just general advice about wood or composite. Products within the same broad category can have different requirements. Follow the selected decking manufacturer’s instructions for fasteners, spacing, and installation. When the plan and product guidance don’t align, resolve the mismatch before boards are installed. Using the wrong fasteners or overlooking flashing Fasteners need to suit both the decking material and the application. An incompatible or incorrectly installed fastener can affect how boards sit, hold, or appear over time. Some systems call for concealed fasteners, while others specify a particular face-fastening approach. Don’t substitute based on appearance or convenience. Follow the product’s instructions for fastener type, placement, and installation. Water management matters where the deck meets the house. Properly planned flashing helps direct water away from the connection and the building materials behind it. If flashing is missing, damaged, or installed in a way that traps water, moisture can reach areas that should remain protected. A neat surface won’t correct a poor water-management detail underneath. Before covering the frame, pause if you see questionable connections, staining, soft or deteriorated wood, or signs that water may be getting behind the structure. These observations don’t identify the cause on their own, but they warrant assessment before work proceeds. Don’t conceal a concern beneath new decking. Resolving it while the relevant area is accessible can help prevent avoidable rework and protect the finished installation. A Practical Deck-Building Checklist for Safety and Finish Quality A review at each project stage helps catch mismatches before they’re hidden by the next layer of work. Use this checklist to compare the plans, installed work, and product instructions. It can help you spot common deck building mistakes to avoid, but it doesn’t replace a professional assessment or the authority’s review of requirements for your property. Review the plan before materials and framing are committed Before construction starts, make sure the written plan reflects how you intend to use the deck and how it fits the house and yard. Check access, drainage, structural details, selected materials, and applicable local requirements. Resolve unanswered questions before ordering materials or beginning framing. Confirm the layout. Compare the dimensions and planned use with house access, door locations, paths, grade, and water movement around the site. Make sure stairs and routes to the yard are accounted for, not added as an afterthought. Match the materials to the plans. Check that the specified decking and framing details work together. Keep the selected product’s installation instructions with the project documents so spacing, fastening, and other requirements can be reviewed as work proceeds. Verify current local requirements. Confirm which permits and building requirements apply to the specific property with the responsible local authority. Louisville homeowners can consult the official Louisville Metro Construction Review information. For Southern Indiana properties, use the official building or planning resources for the city or county where the home is located. Requirements can vary by jurisdiction, so don’t rely on a different property’s project as a guide. Inspect framing, stairs, railings, and finishing details During construction, review each stage while the work is still visible. Use the approved plans and product instructions as the reference, rather than relying only on how the deck looks from above. If a detail doesn’t appear to match, pause and have it addressed before the next stage covers it. Review the frame. Compare framing alignment, connections, joist spacing, and blocking with the plans and applicable product instructions. Look for changes from the documented design that haven’t been resolved. Check stairs, guardrails, and access. Assess their placement and construction against the approved plans and current requirements for the property. Confirm that doors, stairs, and routes across the deck remain usable and unobstructed. Look over the finish. Before considering the project complete, check for incomplete flashing, exposed or unsuitable fasteners, loose-looking boards, and signs of water-management problems. These observations don’t diagnose a cause, but they’re reasons to request a closer review before accepting the finished work. A steady, documented review makes it easier to raise concerns at the right time. Home Run Improvement provides residential decking services in Louisville and its wider service area. Home Run Improvement residential decking services Avoid Deck-Building Mistakes With Professional Project Planning A homeowner checklist can reveal questions that need attention, but it can’t replace project-specific judgment. Planning support is especially useful when the framing is uncertain, the deck’s connection to the house needs review, the site has challenging slopes or drainage, or the chosen material’s installation instructions are unclear. Addressing those details before construction advances can help prevent avoidable changes later. When a deck project benefits from experienced oversight Structural uncertainty deserves careful attention. If the existing frame is difficult to assess, the house attachment raises questions, or the design includes multiple levels, unusual angles, or tight access, a professional can help connect site conditions with the structural plan and selected materials. That means looking at how the whole project fits together, not treating each decision in isolation. Experienced planning also helps surface conflicts early. For example, a layout may look workable on paper but require adjustments for the property’s grade, water movement, door access, or product-specific framing instructions. A qualified deck professional can help review those conditions and plan construction details against the project documents and applicable requirements. Good planning reduces uncertainty, but it doesn’t eliminate normal upkeep or prevent every future issue. Plan a Louisville-area deck project with a clear next step For homeowners in Louisville and Home Run Improvement’s wider service area, professional deck-building services provide a practical path from early planning to construction. A project discussion can bring the intended layout, material choice, site conditions, and structural questions into one plan. Home Run Improvement offers free estimates for residential decking projects. Home Run Improvement’s workmanship is backed by a 10-year warranty. Review the warranty terms to understand the stated coverage and its applicability to your project. Before work begins, gather any existing plans, note your intended uses for the deck, and record questions about the site or materials. Clear information helps make project planning more focused. If a structural detail remains uncertain, resolve it before it disappears beneath the finished surface. Residential decking and project planning Make Your Deck Plan the Strongest Starting Point A durable deck begins with decisions that fit your home, your plans, and the way you want to use the space. If a detail feels uncertain, resolve it before construction moves forward. That small pause can help prevent a rushed choice from becoming a correction later. Use the common deck building mistakes to avoid as a prompt to prepare for a project conversation: note what matters most to you, gather any existing plans, and identify questions about the site or materials. A clear starting point helps turn ideas into a practical plan and gives you more confidence in the decisions ahead. Louisville-area deck planning information With thoughtful preparation and the right guidance, you can move ahead with greater clarity and build a deck designed to serve your home well. Frequently Asked Questions Do I need a permit to build a deck in Louisville, Kentucky? A permit may be required, depending on your property and project details, so verify before construction begins. Check current guidance with Louisville Metro Construction Review, the official local resource. If your home is outside Louisville Metro, consult the authority for that address. Assuming a neighbor’s deck followed the same process can lead to problems. Checking requirements early is one of the common deck building mistakes to avoid. Can I attach a deck ledger board over siding? No, siding isn’t a structural attachment point for a deck ledger. The ledger needs to connect to suitable house framing, with the exterior finish and water-management details handled appropriately. Simply driving fasteners through siding can leave the ledger separated from the framing or create a path for water. If you can’t tell what’s behind the siding, have the attachment assessed before building around it. How far apart should deck joists be? There isn’t one spacing that suits every deck. The decking product, board profile, and installation pattern determine the required support, so use the instructions for the exact material selected. For instance, diagonal layouts may need different framing support than boards installed perpendicular to joists. TimberTech provides product-specific joist-spacing guidance. Don’t apply one manufacturer’s directions to another product. What happens if a deck is built without proper flashing? Water can get behind the ledger or into the house-side framing, where it may contribute to moisture damage and deterioration that isn’t visible from the deck surface. Flashing helps direct water away from that connection, but it can’t correct framing that’s already damaged. If you notice staining, soft wood, or signs of moisture near the house attachment, have the area assessed before covering it or adding new decking. Can new decking be installed over an existing deck frame? Sometimes, but only after the frame is assessed for its condition and compatibility with the new boards. Look beyond the visible surface: check for movement, deterioration, misalignment, and framing that doesn’t match the new product’s instructions. A frame that supported one type of decking may not suit another product or layout. If the structure or house connection is uncertain, get a qualified review before covering it. When are guardrails required on a deck? Requirements depend on the locally adopted building rules and the deck’s height. The research guidance for residential decks identifies guardrails for decks more than 30 inches above ground, with a minimum height of 36 inches, but local requirements may differ. Check the rules that apply to your property and compare the completed railings with approved plans. Include stairs and transitions in that review, since safety details apply beyond the deck’s edge. Is composite decking installed the same way as wood decking? No. Composite and wood decking can require different framing, spacing, fasteners, and installation methods. A composite board may use a specific fastening system or have support requirements that differ from the lumber boards in a typical wood design. Follow the instructions for the chosen product and board profile, including details for edges and joints. Matching the frame and fasteners to the material helps prevent fit and finish problems. Planning a deck in Louisville, Southern Indiana, or a nearby community? Request a free estimate from Home Run Improvement for your residential decking project .